Pieced Hexie Quilt
This is the story about how I made an easy idea way more complicated that it needed to be.
It’s a story about how I finally made those pesky Y-seams work for me.
It started by hunting for the perfect fabrics for my friend, Chelsea, who is expecting a little man any day now. She told me her nursery would be primarily neutral so that was my starting point. I spent a LOT of time perusing The Fat Quarter Shop website and Pinterest mixing and matching fabrics, ideas and kits. Finally, I settled on two beautiful bundles of fabric from Art Gallery Fabrics – Grey ColorFUN and Ivory ColorFUN.
This is the ivory FQ bundle. Isn’t it cute? I really love the pops of gold and yellow.

Mail takes quite a bit longer to arrive here than it does stateside, so I thought that would give me plenty of time to nail down a design. So wrong. I really struggled with indecisiveness on this one. Sorting through the 100s of quilt photos I’ve pinned on my Pinterest page, I finally decided I wanted to make a hexie quilt.
I’ve made hexie quilts before, the traditional pieced way, by sewing together half hexies in rows. Quick, easy and oh so cute.
One week away from the baby shower I was hosting for Chelsea, and where I really wanted to gift the quilt, I went into panic mode and got my bum into gear to make the quilt.
I got the fabrics ironed and I picked out which prints I wanted to use and which weren’t working for me. My last big decision was to determine how big I wanted my hexagons to be. I wanted to use Julie Herman’s Hex N More since it’s in my quilting tool arsenal and love how easy it makes cutting. The ruler has several different size options so I started placing the clear ruler over the prints to determine the best scale to capture my favorite motifs.
This cutie, right here, ruined everything. How could I justify putting a seam through or decapitating my poor owl friend? That would completely ruin the integrity and all around kawaii-ness of the quilt!

Kawaii, the Japanese word for cute, is one of the most useful words I’ve learned in Japan. There’s your Japanese lesson for the day. 😉
Only a few days before the shower with an absolutely full calendar, what’s a girl to do? Learn how to piece Y-seams, and to a degree that the perfectionist in me would be proud of, of course.
I cut a few hexagons from scrap fabric, watched a few YouTube tutorials and it seemed doable. I’d just need to find a technique for pieced hexies that worked and hopefully not ruin the project. (FYI – I settled on marking my start and end points with a Frixon pen and working in rows.)
I started cutting hexagons from my fat quarters, which conveniently left me with remnants that were perfect for the end columns. Thank goodness something worked out well for me!

I pulled some yellow prints in from my stash, too. I just couldn’t bare not using color!
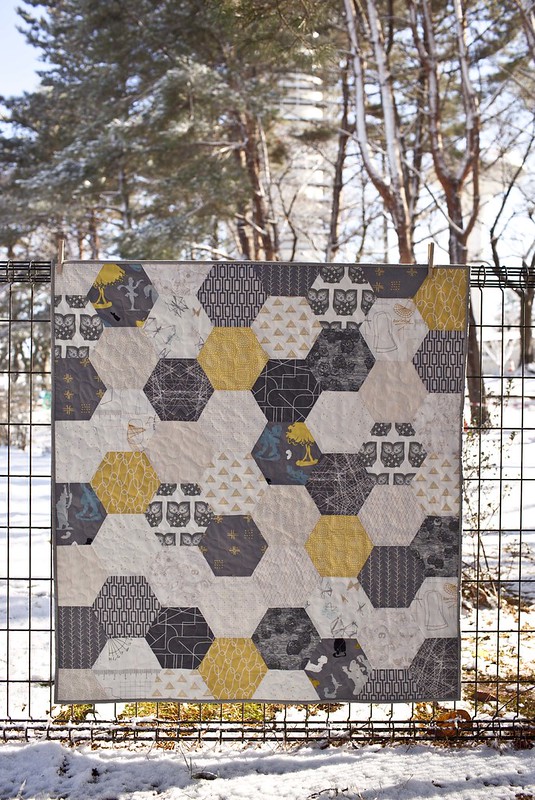
After all my stress and worry about mastering a new technique on a deadline for a gift, it worked out in the end. Look at those points! (humble brag?)

I ordered a spool of 50wt Aurifil in Light Sand which coordinated perfectly for a simple meander stitch. Sorry for the low quality iPhone photo, I did most of my quilting after dark!

The quilt came together the night before the shower, and my friend was kind enough to snap a few photos right before the event. I’m so happy with the way it turned out and, dare I say it, I’m even willing to try another pieced hexie project.
Gifting a quilt is the best! Chelsea was all smiles when she opened her gift. Yay!

I backed and hand-bound the quilt in a coordinating print (Prisma Elements Marble Shadow) that was on the front in a different colorway.

I sure hope all my expecting friends don’t mind receiving quilts because I sure love making them. Which reminds me – I have more baby quilts to make. So many new little ones on their way!